Bonfire Night Firecracker Gift Box | Helen Williams | Silhouette UK Blog
Bonfire Night Firecracker Gift Box | Silhouette Glitter Sticker Paper
Hi everyone, Helen here today.
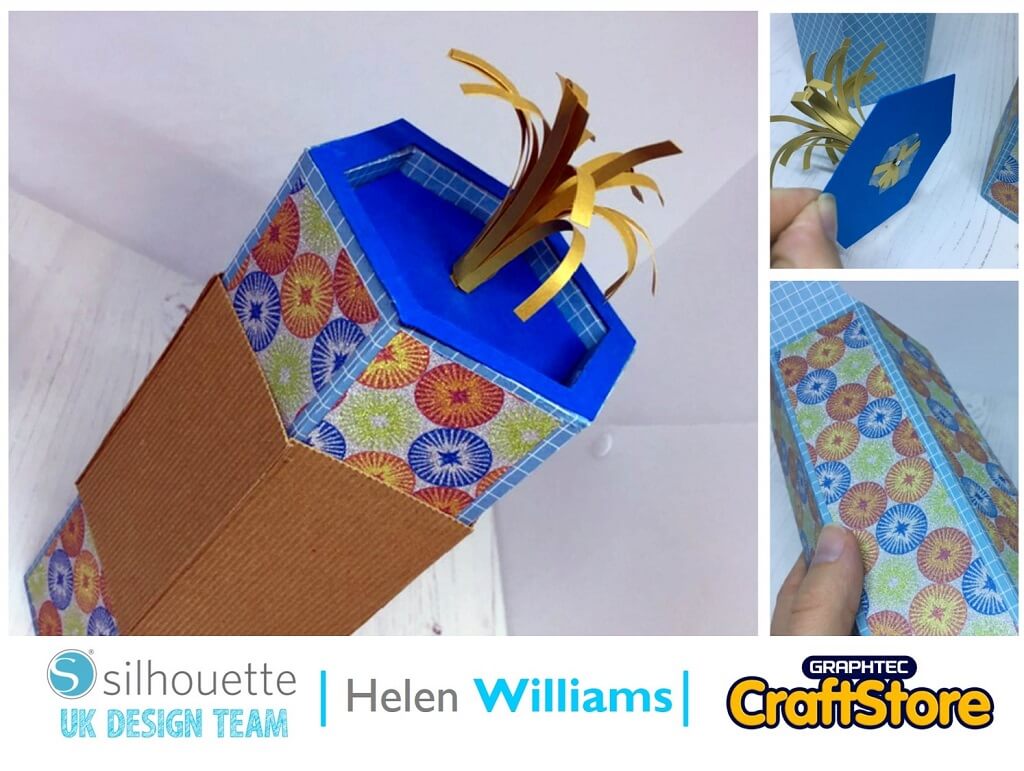
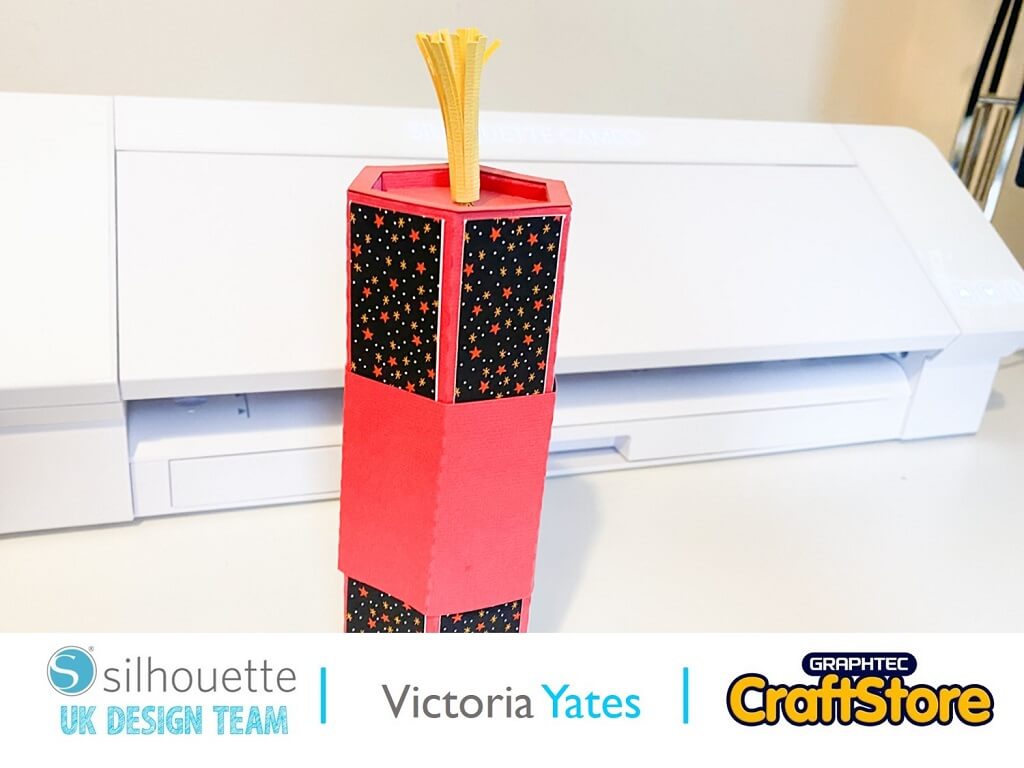
Today I am showing you how to make this super cute bonfire night firecracker box using the Silhouette printable glitter sticker paper to add that extra bit of sparkle.
Glitter Sticker Paper: Print & Cut
When you first open the file in Silhouette Studio you will need to resize the file to fit on your paper or cardstock. Do this by selecting the file and then click and drag the corner. I used the largest element and made sure that fitted on the 12 x 12 canvas.
Once you are happy with the size of the file, ungroup the elements by right clicking and choosing ‘ungroup’ on the drop down menu. I wanted to cut the size panels out of colourful printed sticker paper. To do this I first resized the canvas size to the size of the glitter paper using the page set up panel. Type in the measurements of the paper. You will then need to go to the registration marks tab and add registration marks to the size of canvas. This means that you will be able to cut the shapes out once you have printed them.
To add the patterned design to the panels I opened the patterned paper in Silhouette Studio. I then cut and pasted it into the file I was working on. I selected one of the panel pieces and moved it on top of the patterned design using the ‘bring to front’ button on the top tool bar.
Then select both the panel and the patterned piece and open the ‘modify’ menu. Click on ‘crop’. Drag the now patterned panel on to the canvas and replicate menu and replicate the panel so you have four in the canvas. Make sure you keep them inside the registration marks.
Once you are happy with the position of your design print on the glitter sticker paper. The glitter paper went through the printer very easily and the print quality was very good.
(Make Sure You Scroll To The Right For Both Images)
Cutting The Glitter Paper
Once you have printed on the glitter paper load it onto your carrier sheet and into the Silhouette machine.
In Silhouette Studio go to the ‘Send’ menu. Select ‘Glitter sticker paper’ from the drop down menu. Press send. The machine will then find the registration marks and cut the glitter paper.
I found that the machine was more effective at finding the registration marks on the glitter sticker paper by shining a torch on them when the machine was searching for them.
Cut the rest of the piece out or normal paper or cardstock. You are then ready to assemble the firecracker.
(Make Sure You Scroll To The Right For Both Images)
Assembling The Firecracker
The makers of the file, SnapDragon Snippits, have created a really good tutorial to assemble this file which you can find here. CLICK
I’ll give you a quick run through how I did it too.
This first thing I did was to stick the glitter paper to the large side of the box. I then stuck the side of the box together to form a tube.
The top of the box was a bit tricky to stick together. You will need to fold down each tab and stick to the next tab as you go around the top of the box. The part of the box essentially makes the lid of the box.
Assemble the bottom of the box by sticking each side together in turn. You can also stick an optional hexagon on the bottom of the box to cover the finger hole if you want to.
The fuse if very simple to put together. Roll the fuse part then push through the smaller hexagon and stick to the base. Cover with a second hexagon and stick to the top of the lid. I also stuck the rim to the lid to neaten up the side.
Finally add the wrap round piece to the side of the box. You can also add the label to the box. I didn’t like how the label looked on mine when so I just tied some ribbon around it and the box was finished.
(Make Sure You Scroll To The Right For Both Images)
A Cracking Night
I really liked this project. I’m going to put sweets in the box for the kids on bonfire night.
They will really enjoy having some sweets to each whilst they wait for all the firework fun.
Check out my next blog using printable HTV to create some thanksgiving t-shirts for the kids.
– Helen Williams –
Silhouette UK Blog Created By Helen Williams
Silhouette Products Used
Silhouette Designs Used
• Design Used: Mod Stars Pattern Small
Design Store Artist: Jennifer Wambach
Design Store ID: 23702 > Download
• Design Used: 3D Short Stick Firecracker Box
Design Store Artist: Snapdragon Snippets
Design Store ID: 60849 > Download
Share On Social Media
