Cardstock Wedding Cake | Denise Clark | Silhouette UK Blog

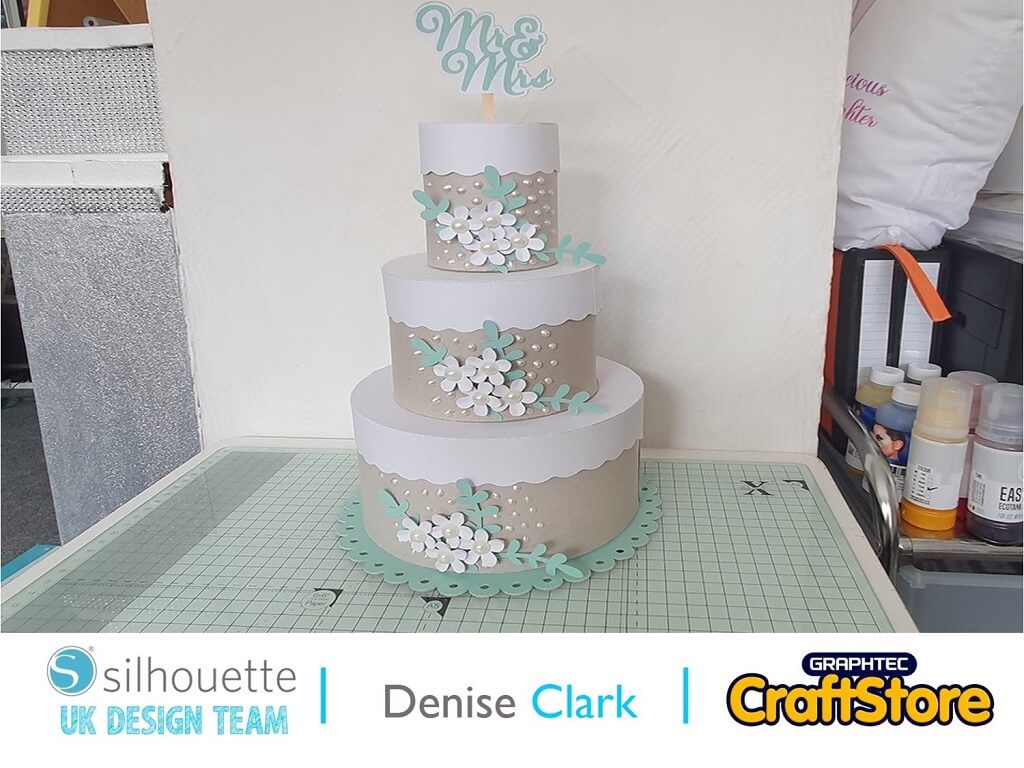
Cardstock Wedding Cake
It’s Denise here today.
My blog today is about wedding cake which fits in nicely with the Wedding summer season and now restrictions have eased a little more.
For all you special lovely Brides starting to make arrangements for you’re wedding, here is a lovely 3 tier Wedding cake that you can accommodate to your own needs.
Or if you’re making it as a present it’s gorgeous to use for your needs.
Materials Used
• Silhouette Adhesive-Backed Cardstock
• Silhouette Chipboard
• Wet Glue
• Pearls & Pearl Drops

Open Your File
Once you have opened your software, go to top right hand corner and click on library and look for the file and click for it to open on your design space.
You will see once your file is showing that it’s grouped together so the first thing we need to do is ungroup it.
To do this, click on it to bring a box around it then right click and scroll for ungrouping, click on it and then click anywhere on you design area to release parts of the file.
You will see it’s already colour coded for you, that’s to help you to identify the parts.
Click and drag the parts off the design space. I started with the main box to get cut first which is 7” wide.
All 3 boxes stack together and layer perfectly.
I used chipboard for base of cake box and self-adhesive cardstock for the lid.
Cutting Your File
To cut your file, lets pop on over to the top right hand corner where you can see the send tab, click on it and this is the part that does your cutting.
The media I’m using for the base is Chipboard. I click the arrow down and a dropdown menu appears. Now look for chipboard. If you are using the AutoBlade everything else is automatically done for you.
Add your media to your cutting mat and load it into the Cameo and press send.
Cut all of your parts out first or if you prefer just cut the 3 boxes out first.
Remember, if using different media to change your media type for the certain cuts.
I adhere them together and put them aside then I cut out the base which I cut twice once with chipboard and then again with the self-adhesive card stock to make it a little stronger for the base.
I cut out the flowers, vines and the Mr & Mrs last and the layered part for it too.
I cut out double the amount of flowers with self-adhesive cardstock, cut my leaves with it and the Mr & Mrs both parts.
I cut an extra part of the base( layered part of topper) but this time I flip it horizontally this fits perfect at the back as I added a stick to hold the topper together and in the cake as you will see there is a box part it looks like top of box and no it’s not missing the base.
This part sits inside your top box to hold straw, stirrer whatever you use to hold topper of the cake.


Putting Your File Together
I started with the 7” box, that’s the main one that sits on the base you will see there is wings on them.
Fold them over and turn the part over and press down making sure all going same way do this with the another part for the base of box.
You will see there is a tab on them both. This is where your wet glue comes in.
Glue the tab as shown in the photo and adhere it to the other part of the same part of file you have in front of you.
Now glue the end tab and adhere together it now becomes a circle. Now grab the circle that’s for the base which remember the colour code in your file.
There is 2 circles, one for inside and other for bottom, glue all around the edge then adhere it to the base do what is easiest for you. I added it inside first then outside bottom next and line it up to the edge of the circle all way around.
Now to do the lid it’s the same as the base putting together, I forgot to take photo.
You do the lid same way as base no different at all. Once you made the base box you can For the base for the cake to sir on. I put the 2 cuts I cut out and adhere them together.
I peeled off the backing of the green base and adhere it to the chipboard I cut out the same, that strengthened it more. go on and do the other 2 boxes which are medium is 5” wide and the small is 3” wide.
They are really good size of boxes.
Adding The Flowers & Vines
Mind I told you I cut out double the amount of flowers that’s due to me using the self-adhesive cardstock.
I peeled of backing on 2 of the flowers and adhere them together making sure they stuck together.
I shaped them as if you look closely to them they have a perforated line on the petals. I shaped them by using the line as my guideline to shape them.
I put them aside and started on the vines.
I peeled back the backing just enough to add wet glue on them to stick to the cake boxes like in the photo.
Now to stick them to the cake doesn’t matter what way you put them on it really down to you.
I put on the vines first by adhere them on the bases of the cake (part of them used wet glue) did that to all 3 of them and I then started to add the flowers by using silicone gel on the flowers to have them looking more standing out.


Adding The Last Part
Here is where we add the Mr & Mrs together. I adhere the Mr & Mrs to the base layer of it which I peeled of the backing as I was adding wet glue to put a backing onto it.
For this I used wooden stirrers added the topper by adhere it to the stirrer then the last part which remember I mentioned I cut for the back by flip horizontally which fits perfect on the back I took the backing of it and added it to the main topper making sure it was secured with the wet glue.
Then do you remember to add the little box part with the hole in it which goes inside your small box this is to help to keep your stirrer/ straw in one place add it by putting it through the top of small box where the hole is and it should go straight down and stand in it’s little stand inside the box.
I added pearls to the flowers by adhering them with silicon glue and pearl drops are the flowers and vines.
This is it you have made a beautiful 3 tier cake which you can fill with anything you like or even use it as a table decoration.
I really enjoyed making this wedding cake. It will look good no matter how you present it on show.
I will certainly be making another one as a gift when a wedding pops up as I loved doing it all from cutting to putting it altogether.
– Denise Clark –
Silhouette UK Blog Created By Denise Clark

Silhouette Products Used
Silhouette Designs Used
• Design Used: Tiered Cake Wedding
Design Store Artist: Lori Whitlock
Design Store ID: 120854 > Download
Share On Social Media
