Cardstock Wreath | Victoria Yates | Silhouette UK Blog
Cardstock Door Wreath
Hey everyone!
Vicky here from Cut That Design!
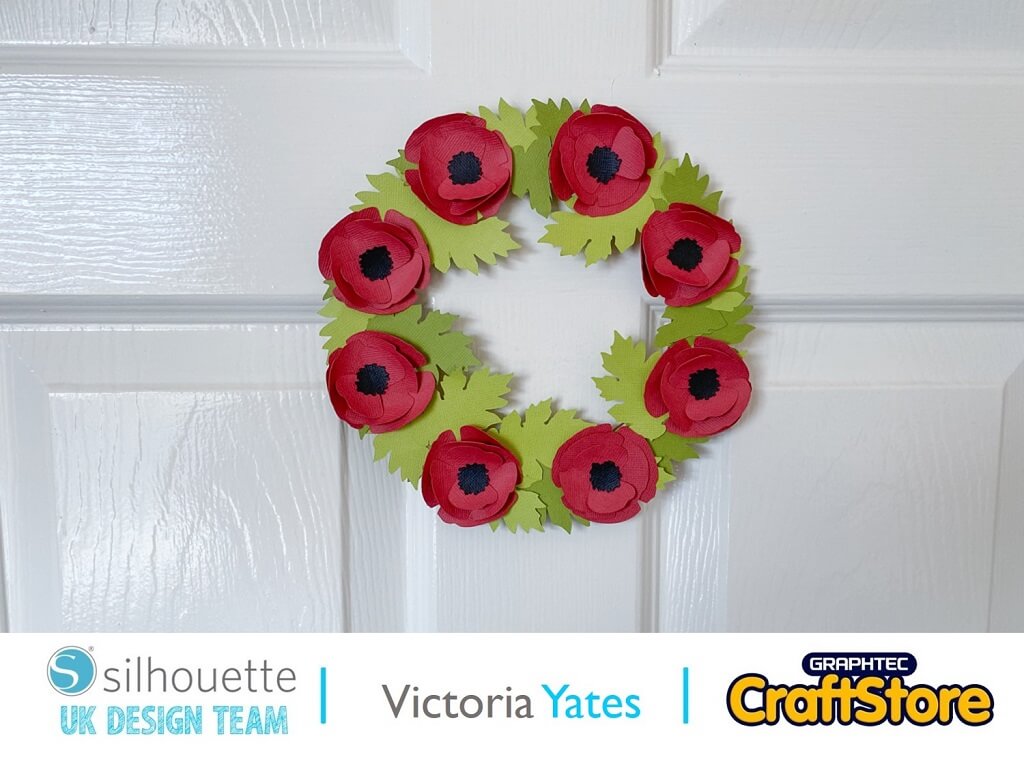
For this project I have made a Remembrance Day wreath, using Silhouette’s Self Adhesive Cardstock and a MDF craft ring I had in my craft stash, which I thought was perfect for this project!
Items you will need:
Silhouette Adhesive Backed Cardstock
MDF Craft / Wreath Ring
Strong Adhesive Sticky Pads (To Adhere Wreath To The Door / Wall)

Open Your Files In Silhouette Studio
I went searching for a 3D Poppy and a leaf in the Silhouette Design store, I purchased, downloaded and opened them up in Silhouette Studio.
I also coloured them in so I could see them clearly.
Replicate
I measured the MDF ring that I was applying to design to, to gauge how many Poppies and leaves I was going to need.
I then used the replicate tool to make several duplicates of the Poppy sections and the leaves.


Cutting The Design
I grouped the sections by colour and sent them to cut.
I did an extra cut of the leaves using a different shade of green, so the wreath would have no gaps showing the wood ring underneath.
Cutting With Cardstock
Next up, I changed the cut settings in the ‘Design Area’, to 12×12 cardstock and removed the registration marks.
I grouped the design by colour, as it’ll be easier for me to move them around on the cutting mat.
I loaded my cutting mat with the first colour of cardstock, set my material as; Cardstock Adhesive Backed, and kept the default cut settings.
I pressed send to cut. I then removed the material from the cutting mat.
I repeated these steps for each colour of cardstock.


Prepping The Poppy
To give the poppy that 3d effect, I curled the edges with my weeding tool, although the same can be done with a pencil or a pen.
Adhere The Poppy Sections
I then adhered the different sections to the Poppy, starting with the largest at the bottom.
I repeated the same process with every Poppy!
As I am using Silhouettes Self-adhesive Cardstock, no glue is required!


Add Leaves Around The Frame
I added the leaves around the wooden frame as shown, the leaves adhered nicely to the wooden frame.
I had a few leaves left over which kept to one side.
Adding The Poppies
I added all the poppies to the wreath.
Once all the poppies were added, I used the leaves that I kept to one side and added them to the wreath where the wood was showing.

Here’s my completed wreath, I added a Strong adhesive foam pad to the back of the wreath and placed it on my door.
I am really pleased with the way this has turned out, and it was so much fun to make.
If you like crafting with Cardstock as much as I do, you will love this fun and quick project.
Thank you for reading and Happy Crafting.
– Victoria Yates xx –
Silhouette UK Blog Created By Victoria Yates
Silhouette Products Used
Silhouette Designs Used
• Design Used: 3D Poppy
Design Store Artist: Silhouette
Design Store ID: 14524 > Download
• Design Used: Leaf
Design Store Artist: Silhouette
Design Store ID: 1472 > Download
Share On Social Media


