Christmas Advent Calendar Block | Denise Clark | Silhouette UK Blog
Christmas Advent Calendar Block
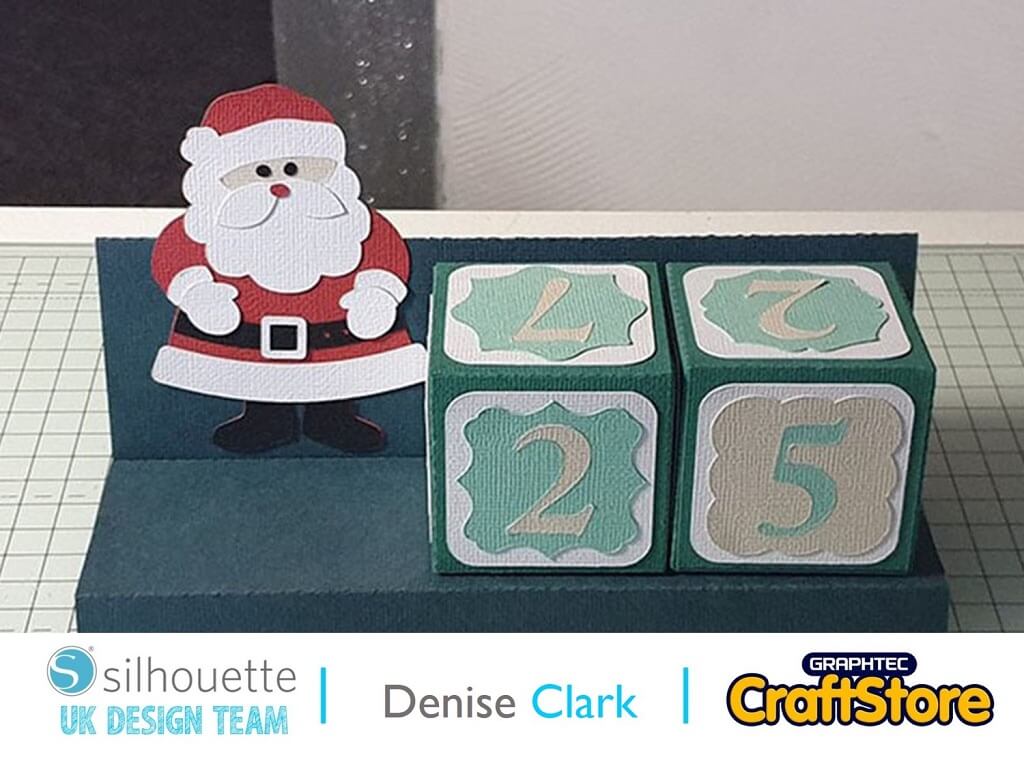
Hi, today’s blog is about this great little Christmas advent calendar block.
The countdown to Christmas will soon be on it’s way.
For this calendar block you can use any colours you’d like and you can also get the children involved putting it together.
Santa will soon be here!
Materials Used
Silhouette Adhesive-Backed Cardstock
Double-Sided Tape


Open Your File
Open up Silhouette Studio, go along top right hand corner and click on library and choose your file and then click on it to open it up in your design space.
First file we’re opening up is the 3d Advent calendar block stand (download it below).
You will see that there is small parts aside of your main cutting file that is Santa’s little body.
Click and drag so the whole of the little parts are all selected and drag to side of work space.
Click on the main file that’s still on the work space and once again click and drag so everything is selected and group the file.
Now your ready to start cutting.
Cutting Your File
Now it’s time to cut your file.
You are going to need to go to send screen which is along top right hand side where you’ll find the options for cutting.
Under tool one is your options for cutting.
Where it says material your wanting to click on it and look for cardstock, adhesive-backed, action to cut and tool rachet blade (if your using one).
Once I clicked on the cardstock the blade, speed, force and passes was done automatically with the setting so I didn’t need to touch a thing.
Once you got your cardstock on cutting mat and loaded onto your cameo now press send bottom right of your screen.
Once your main part is cut and off the mat place it to one side.
Now click and drag main file off your work space put it to the side and now click and drag the Santa parts in each colour your using for him and cut each peace the same way not touching anything in your cut settings and press send for them all.
I did all the black colour in one go same with red and so on.


Putting The Stand & Santa Together
Now that all your parts been cut now you can assemble them together.
Fold your main part along the score lines.
Add double-sided adhesive on both of the small ends as shown in picture now to assemble it.
Remove the tape and fold the Santa cut-out piece as shown on the picture. Remove the tape on the other end and fold it back and secure it on the Santa as shown in the picture.
Make your Santa up with all the parts you’ve got cut out with the colours your using by peeling off the backing and adhere your Santa to the stand.
Your Santa stand is complete.
Now To Create The Blocks
Do the same way as you did with the Santa stand opening it up on your design space.
There is more parts to this file 3 parts so will do them one at a time.
Click on your file and click on ungroup, Click and drag to select all your panels together and group them and then take them off your workspace.
Now for the main blocks Click and drag your so your 2 blocks are highlighted and group them.
Do the same with the two sets of number panels on the right side highlight them all by click and drag and make sure all are selected and group and make sure they are off the workspace.


Cutting Your Blocks & Panels
With your selected cardstock on your mat and loaded onto cameo.
First we are cutting the blocks.
Go back to your send screen and use same settings as the Santa stand and cut.
Once cut take of cutting mat and add selected colour for the panels onto your mat I used white and click and drag you blocks off and add your panels to the workspace now cut them same way.
Once cut click and drag the panels off and click and drag the 2 sets of numbers and layers onto workspace.
I cut them out twice in different colours as you will see from picture but you can cut them out with pattern paper/card whatever you wish to use.
Once cut I had extra’s for any mistakes and enough for another stand to make or another project.
Assembling Your Blocks & Panels
Fold on all score marks of your blocks.
Add adhesive to the side tabs.
Fold up the sides and stick together so your block looks like an opened box. Close the lid of the block.
Put them to one side.
I sorted my numbers and layers buy taking the backing of them and adding them to the white panels once those where all done.
I added each panel to the sides of the blocks to complete them


This was really lovely to make, you could easily add more things to it or leave it as you wish.
You could even get the kids involved and let them decorate it.
It was so easy to make up and could be re-used year after year.
Next my blog will be about Stocking fillers! Pop on back relax have a cuppa and read all about it.
– Denise Clark –
Silhouette UK Blog Created By Denise Clark

Silhouette Products Used
Silhouette Designs Used
• Design Used: 3D Advent Calendar Block Stand
Design Store Artist: Samantha Walker
Design Store ID: 34296 > Download
• Design Used: 3D Advent Calendar Blocks
Design Store Artist: Samantha Walker
Design Store ID: 34295 > Download
Share On Social Media


