Christmas Shaker Ornament | Verity Biddlecombe | Silhouette UK Blog
Christmas Shaker Ornament | Silhouette Chipboard Sheets
Hi everyone, Verity here today from PrettyLittleButton.
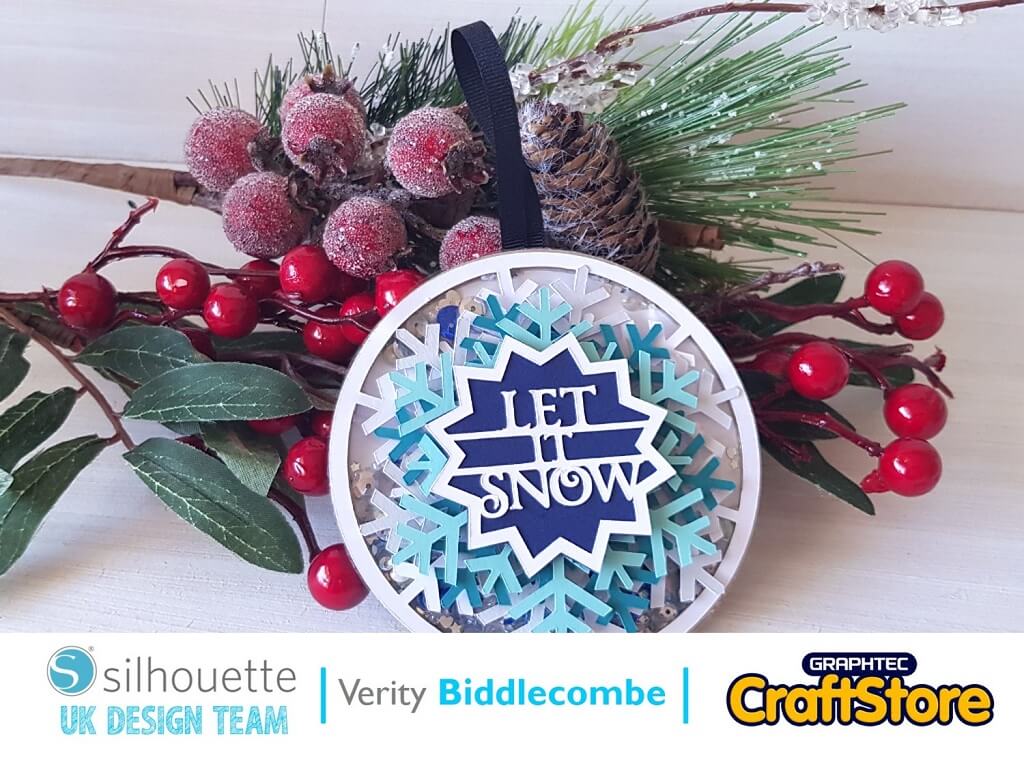
Chipboard is a great way to build up layers to great fun shakers, and why not combine that with Christmas to make Christmas Shaker ornament.
The kids will love adding these ornaments to the tree.
Creating The Layers: Part 1
Download the ‘Let It Snow Christmas Ornament design into your design space.
Next, ungroup all the elements in the design package so each circle element is separate.
Just using the circle snowflake element, draw another circle using the shape tool so the cycle is the same size as the inner circle of the snowflake, as seen in green.
Creating The Layers: Part 2
Make sure you have copied and pasted the circle snowflake element and move one of these to the side.
Next, open up the modify and with both of the circle elements selected, press subtract. This will delete the snowflake from the circle, and you are left with a circle frame.
Cutting The Layers & Reducing Waste
Duplicate the circle frame four times and position these on the mat. Next, also position the circle snowflake and the full circle element.
To prevent creating waste when cutting, select all the circles and open up the ‘Nesting’ window.
Next, press the ‘Nest’ button and the circles will move on the design mat to ensure there is minimal waste. Cut these out of the chipboard sheets, making sure you test cut first.
Cut the remaining layers out of colour card of your choice but remember to cut the full circle and circle snowflake out of white to cover up the chipboard – it is there for stability.
Assembling The Ornament
Adhere the white circle over the top of the chipboard circle and layer up the circle frames. Add a selection of sequins or other shaker elements inside the circle frame. To seal the shaker, cut a circle out of acetate or left-over packaging and adhere down over the shaker elements and circle frame.
To make sure the acetate stays in place, adhere the white circle snowflake over the top. Using foam adhesive, layer up the remaining snowflakes, adding the sentiment to the front.
Lastly adhere a piece of colour corresponding ribbon to the back of the ornament to hang from.
A Fully Personalised Christmas Tree
– Verity Biddlecombe –
Silhouette UK Blog Created By Verity Biddlecombe
Silhouette Products Used
Silhouette Designs Used
• Design Used: Let It Snow Christmas Ornament
Design Store Artist: SAS Creative
Design Store ID: 308952 > Download
Share On Social Media


