Flamingo Fun | Jordy Robinson | Silhouette UK Blog
Flamingo Fun | Created With Shrink Plastic
Hey everyone! Jordy here, back at it again with another blog post.
Our theme for this project was summer, and our material was Silhouette Shrink Plastic Sheets.
I’ve never used, or even seen shrink plastic before so this was a first for me. It was a roller coaster of emotions but the final result is perfect for summer, and nothing says summer like flamingos.
Finding Your Perfect Design
It took me a long time to decide on a design for this, I knew it had to be something flamingo related because I looove flamingos, but the Silhouette Design Store has SO many to choose from.
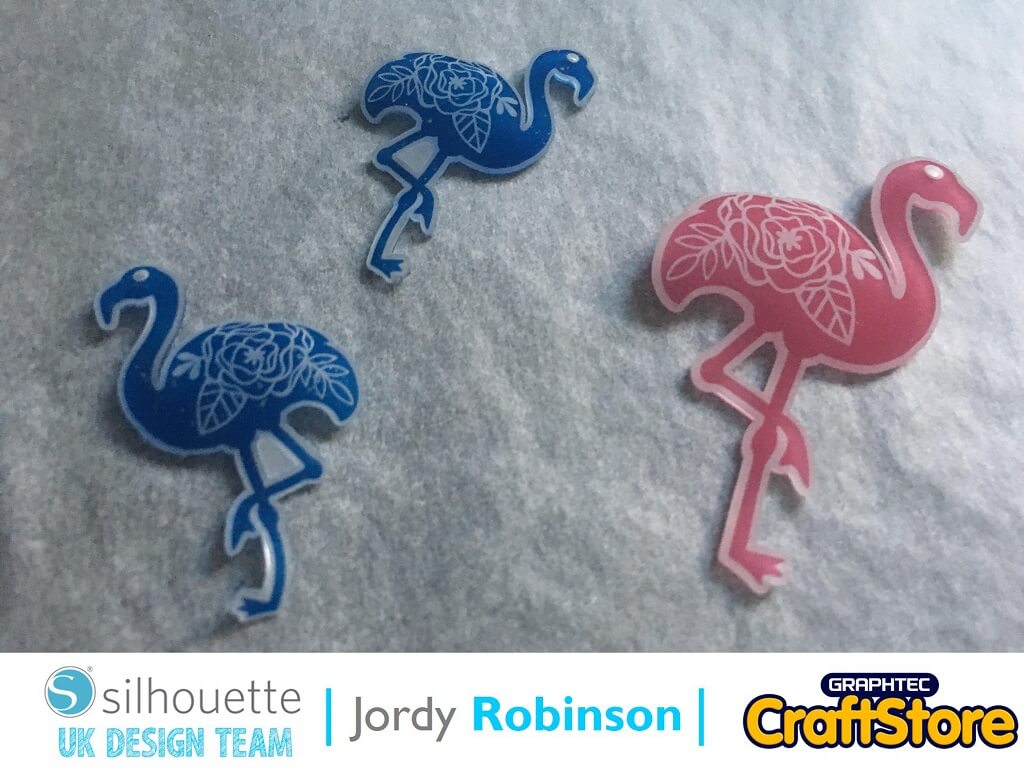
I ended up picking the Flamingo Silhouette Floral by Wild Pilot (Design ID: 282108) because it is super cute and super summery. I love the floral detail on the body and thought it added a little extra summery detail to the design.
Once you’ve found and purchased the design, go ahead and open it up in your design space. I decided I was making a necklace and a pair of earrings. I opted to make 2 of the necklace design, in case something went wrong. I always plan for worst case, and its good to have spares. It also used up space on my shrink plastic, so I didn’t waste any material.
Getting Your Design Ready
So now you’ve gotten the design you want, it’s time to turn them into something workable.
Make sure you turn registration marks on first, this way you can see what space you have to work with. Make sure you never go over the grey hatched areas, or outside of the black registration marks – if you do, the machine won’t cut those areas. Don’t forget you can press “M” when on the design page, to bring up the registration marks. It automatically defaults to type 1 but you can change them in the page setup > registration marks tab if you need too.
The flamingo design has a floral cut inside, so we need to add an offset otherwise the design will try to cut out the floral pattern. To do so, click on the offset tab. (It’s the star with an outline!) Once you click this, it’ll bring up the offset settings. I like to have offsets set about 0.060 for this design, because it also gives an offset for the eye (so we have somewhere to add jump rings too!) but you can decide what is best for you.
Making Multiples
I need to make 4 of the flamingo designs – two for earrings, one for necklace and one back up/spare. To do this, I want to replicate the design. On the toolbar, there is a design with ellipticals overlapping each other. (It’s called Replicated and its 2 up from the offset tab.)
I replicated the flamingo to the right, by clicking on the replicate right button and then shifting the design slightly using my right arrow key on my keyboard. I made sure my design was far enough away from the other flamingo. But now, the design is over the hatching which means it won’t cut. All I did to remedy this was select both flamingos and moved them down a little.
I still need two more flamingos, so grab both flamingos and replicate down. I then moved them until they were in place and made them smaller – I didn’t want earrings too large.
Mirroring Images
I wanted the right flamingos to be mirrored, so that the earrings would sit better and look more visually appealing.
To do so, I highlighted both of the right flamingos (and their offsets) and right clicked. Once the right click menu has popped up, I chose to flip horizontally. Now, the flamingos should be facing each other.
I chose to edit the colour of my earring flamingos, making them blue, you can do them in whatever colour or pattern you want!
Print & Cut
Now the designs are ready, its time to do the fun part. Print and cut.
Click on send, and you’ll see thick red lines appear. I prefer to cut on the “Line” tab because I find it easier. I simply selected the red line and ensure nothing else was ticked.
I set the material to shrink plastic, but this was a bit of a problem for me. It wouldn’t cut through at all, instead of worrying about this, I simply ran it through multiple times until I was happy.
Once the designs were cut, I peeled off the backing paper as instructed in the instructions. (I will admit it took me a good 5 minutes to find the instructions, they’re printed inside the packaging!)
Shrink Plastic Magic
Once the design has been cut, and the backing removed – it’s time to bake! I had never done this before, so watching the plastic do its thing was like magic.
You need to arrange the designs on a baking tray, lined with grease proof paper. The instructions are clear on what you need to do. Make sure your oven is pre-heated to 160 degrees, set the designs on a baking tray spaced evenly apart and bake.
The baking part had myself, my mum and my boyfriend captivated. The shrink plastic needs to shrivel up, which for me was a heart stopping moment which made me honestly panic as I thought they were ruined. But once the shrink up, they start to flatten themselves down. Honestly, the whole process had the three of us shouting “what” repeatedly at the oven as the shrink plastic magic worked its wonders.
Once you have baked them for the time stated on the packaging, remove (carefully) from the oven and leave to cool – if they are curled slightly you can use something heavy to flatten them out.
Once cooled, I turned them into jewelry by adding them to ear wires and a chain. To do this, I simply used some jewelry findings I had in my craft room and a pair of pliers. If you have never done jewelry before, I’d suggest watching some YouTube videos to get an idea on how to do it. Once you learn how to make your own jewelry, with shrink plastic, you’ll never want to buy another necklace again.
Fantastic Flamingo Charms
I hope you enjoyed this tutorial as much as I had writing it. I won’t lie to you, shrink plastic has a massive learning curve but the rewards are amazing. I love making unique jewelry for myself and being able to print my own designs onto the shrink plastic has opened an entire world up.
Imagine being able to make pet tags, custom charms for special occasions, wine glass charms for weddings – the ideas list is endless. You could even try making charm bracelets with photos! I can’t wait to wear my earrings and necklace and tell people I made them myself.
I hope you’ll join me for my next blog post, it’s going to be a fun one (especially if you love planners as much as I do!) Until then, happy crafting.
– Xo Jordy –
Silhouette UK Blog Created By Jordy Robinson
Silhouette Products Used
Silhouette Designs Used
• Silhouette Floral By Wild Pilot: ID: 271645
Share On Social Media
