Mother’s Day Gift Tag | Denise Clark | Silhouette UK Blog
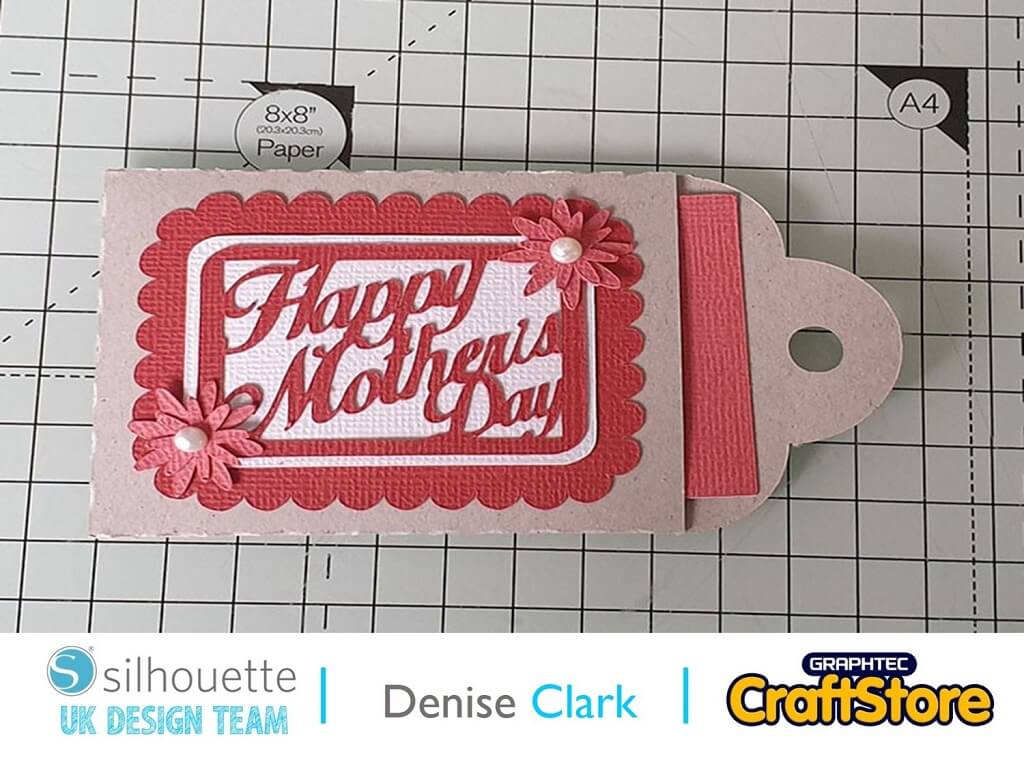
Mother’s Day Gift Card
Hello, Lovelies., it’s Denise here.
Today’s blog is about making a Tag for Mother’s Day which you can add to that special present or just to add to a card.
Materials Used
• 12×12″ Adhesive Backed Cardstock
• DST
• String


Open Your File
Open your software and once loaded go to your library on the top right-hand side and look for the file we are using and open it up.
Once you have opened it up you will see we need to ungroup it. You do that by right clicking on file and scroll down to ungroup and click on it.
Click anywhere on the design space to let the parts go. Now take all your parts off and keep your main tag on the design space.
You will see it will not fit the design area. There are 2 ways to change this. One is set you’re your design area from landscape to portrait or rotate your file. To do this go to the top left side and click on object and then rotate, finally, rotate by 90 degrees clockwise.
I was cutting two tags keeping in mind you don’t have to. I right clicked on the file and scrolled down to duplicate and that way you will have two on your design space. Do this for all if your wanting to make more than one.
Cutting Your File
Once you have loaded your mat with your required cardstock head over to the top right of your software and look for send and click on it.
This is where you will find all the settings for cutting your media.
I’m using my Cameo 4 today, Hubby bought it for me as a surprise. I’m trying to get used to it as I’m new to the Cameo 4 but not the cameo machines, had them all right up to Cameo 4.
Anyway, back to the file!
I went to look for Chipboard under the carriage 1 and did not need to change anything else as it was done automatically now click send to cut your part of file.
Now for rest of the file I used the adhesive backed cardstock, so I changed only the Chipboard to the adhesive backed cardstock. Now do this with the rest of your file with the required colours you have chosen.


Assembling Your Tag
First, I lay everything in front of me of what I have just cut.
I take the main part of the tag and fold the flaps.
I added double sided tape to the flaps on the tag and assembled the tag.
Now for the rest of it.
I didn’t need to use glue as it was adhesive backed cardstock so I layered the parts up as shown in the photo.
I layered up the flower by using two parts and made two of them to go on the tag and then added two small pearl drops in the centre of the flowers to finish them off.
For the last part you have a piece of card to go into the tag which you can write on, put a secret message on it or just to say “I love you”.
Lastly I added a bit of string so you could attached to the present.

This is an easy tag to do that you can use throughout the year and doesn’t need to be just for Mothers Day.
– Denise Clark –
Silhouette UK Blog Created By Denise Clark

Silhouette Products Used
Silhouette Designs Used
• Design Used: Happy Mother’s Day Gift Card Tag
Design Store Artist: Carina Gardner
Design Store ID: 77708 > Download
Share On Social Media


