New Year Chalkboard To Do List | Cherylann McCool | Silhouette UK Blog
New Year Chalkboard To Do List | Silhouette Chalkboard Cardstock
Hi Cheryl here again.
Happy New Year to you all hope you had a great time.
Well, it’s that time of year again, the weather turns and we start to book holidays and thinking about those resolutions, shall I make one or not?
Well, if you are in this group you want to pay attention to this project.
I hope you like this project as much as I do.
Craft Materials Used
• Silhouette Adhesive-Backed Chalkboard Cardstock
• Adhesive Vinyl
• Glitter Cardstock
• Chalk / Chalk Pens
• Glue
• Ribbons & Flowers
Open Your File
In your Silhouette Studio software open your files in the design space and in the page setup box to the left of your grid you will want to check your machine in option 1 is correct, then in option 2 select the mat size you will be using and finally in option 3, select the size of your media.
Down at the bottom make sure you tick Show Cut Border.
Ensure Your Design Fits
You now want to make sure that your design fits within the red border and the size you are cutting is relevant to your material you are using.
Once this is done you want to hit the send button in the top right hand corner.
Select The Correct Media
You will see the screen change and your grid screen is showing your design in a brighter red (that’s to show what is to be cut).
On the right hand side you will see material change that to Vinyl Metallic, you will then see the other options adapt to this media.
You will now want to put your media onto your mat and line it up accurately before hitting the send at the bottom.
Cutting The Chalkboard Cardstock
Once your chalkboard has been cut use your spatula to lift off the Chalkboard cardstock to reveal your To Do List template.
Next, you want to follow the steps above again and cut out the vinyl lettering.
Putting It All Together
Now the fun bit. Time to put it all together.
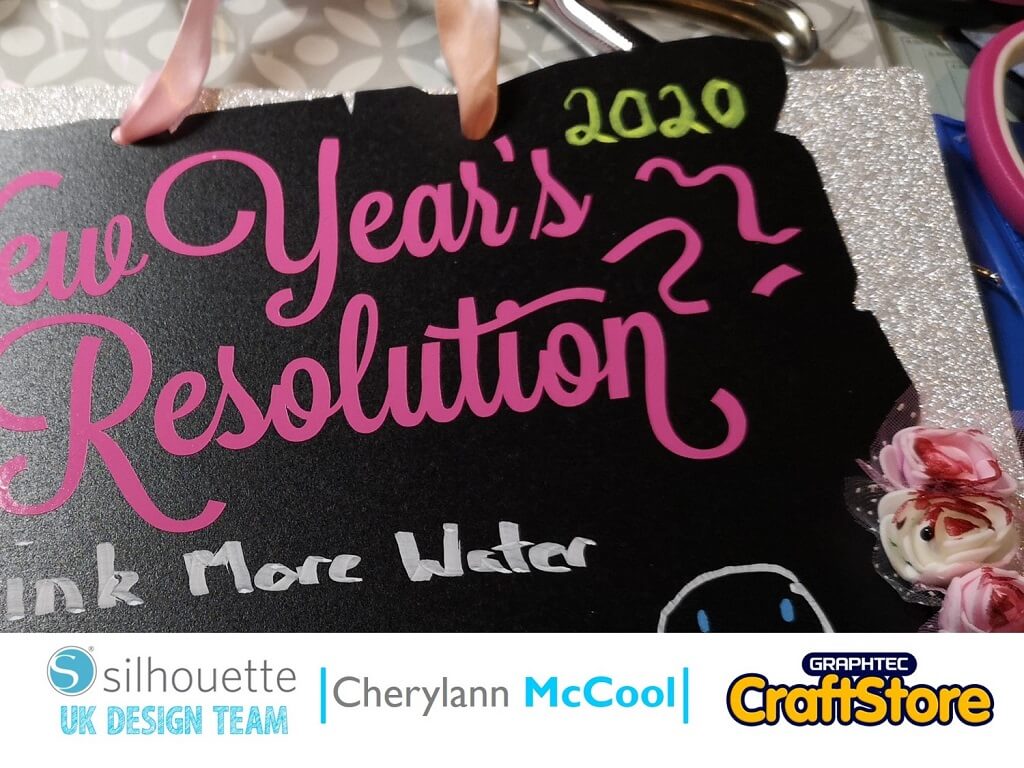
With your glitter card you should stick your chalkboard cardstock at an angle or any way you like.
Once this has been done you then want to place your vinyl on the chalkboard placing it so you enough space to write.
Final Checks
Once the Vinyl is on you can then customise it with your chalk or chalk pens by writing your resolutions or goals onto it.
You might want to punch 2 holes at the top and put and tie your ribbon at the end and then you can add flowers or any other decorations and your Resolution To Do Board is complete.
Resolutions Are There To Be Followed
OMG how excited I am with this project and the ones coming up!
I had so much fun making this and I can carry my message board with my resolutions about with me.
I never ever thought I could cut Chalkboard on my Cameo but stepping out of my comfort zone and trying these Silhouette products are a lot easier than you would think and yes you should give it a try.
Wait until you see my next project, Bye for now!
– Cherylann McCool xx –
Silhouette UK Blog Created By Cherylann McCool
Silhouette Products Used
Silhouette Designs Used
• Design Used: Rectangle Shadow
Design Store Artist: Hero Arts
Design ID: 7412 > Download
• Design Used: New Year’s Resolution
Design Store Artist: Jamie Lane Designs
Design ID: 72383 > Download
Share On Social Media
