Remembrance Light Frame | Denise Clark | Silhouette UK Blog
Remembrance Light Frame
The make today is about Remembrance.
I get so emotional with things like this. I just had to do this and really pleased of the outcome of it.
I love seeing Poppy’s going about and I always make a point in having one!
Now for the step by step of doing such a beautiful frame that proudly stands on the unit.
Materials Used
Silhouette Adhesive Vinyl
Blank Picture Frame
Battery LED Lights


Open Your File
Open up your Silhouette Studio software, and then go along to your library.
Now choose your file you are wanting to use.
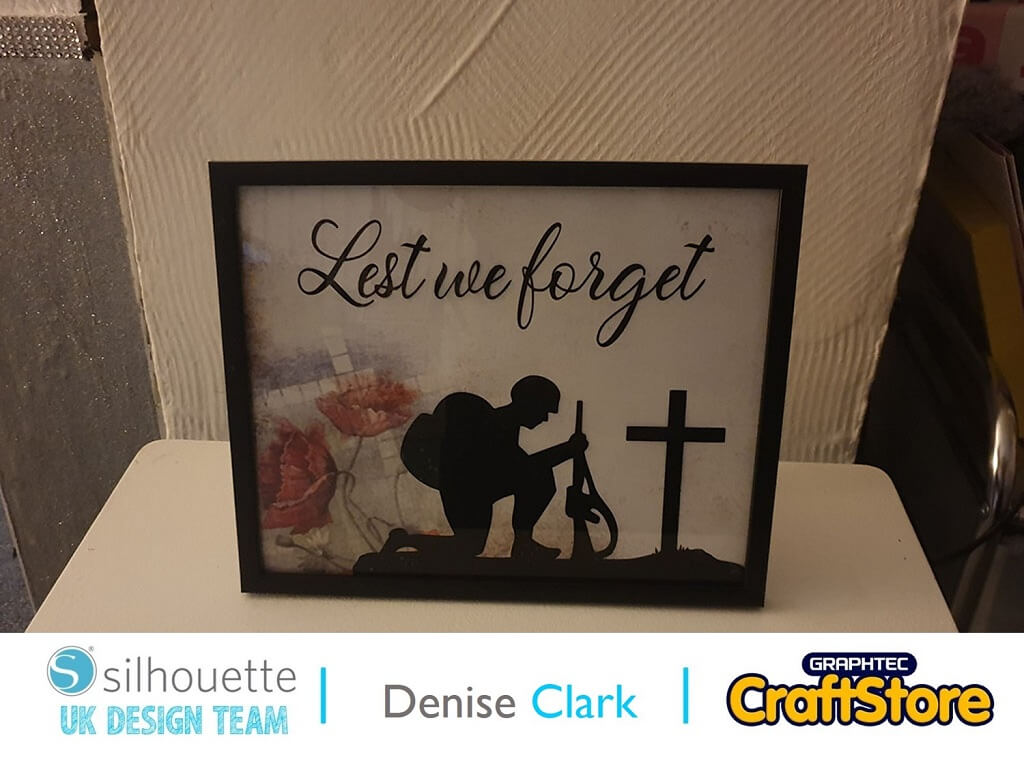
Now the first file I chosen was the Poppies Pattern.
I set my design space for 10”x8” as that was the size of my frame I’m using.
Click on the printer and go by using your preferred printing preferences and print your pattern.
Cut to size if needed once printed.
Put that to one side and now for the cutting files.
Choosing Your Cutting File
The file I chose form this project is the Kneeling Soldier, I loved using this design.
For the size of frame I had to decrease the size of it by clicking on the file and dragging it to the size I wanted as I didn’t want to hide the poppies too much.
The poppies design just sets it of in the background.
For this file you need to mirror the image as it’s going on the inside of the glass frame.
For the design I used black adhesive vinyl.
Keeping your file on the design space, click on the “A” down the left side of screen, now go to your design space and left click your mouse that will bring up a line for you to do your text.
I put “Lest We Forget” and on the right side of your screen click on the “A” the first one on the side that comes up with all the fonts.
Scroll down to see the fonts.
Whilst highlighted, click and drag along your font making sure it’s totally covered and then click on the font you wish to use.
I went for “Mettona script” as it’s a beautiful font for the theme to use as you will see from the pictures.
Click on your font and highlight it as you will need to weld the letters together once you’ve done that you need to group it and left click on your font wording so a box shows around it and click and drag on corner to resize to preferred size and after you have done those steps your font is ready,


Cutting Your Files
Keep your poppies pattern to the side of your design space and have your words and image on the space your working on.
This time you will need to mirror both files as it’s going on the inside of your frame.
You are going to need to go to send screen where you’ll find the options for cutting.
At this point remember to have your FILES MIRRORED.
I put a box round both files so when it comes to the time to cut and weed it is easier taking of the waste vinyl.
Under tool one in your options for cutting beside where it says Material your wanting to click on it and look for vinyl gloss, action to cut and tool ratchet blade.
Once I clicked on vinyl glossy the blade, speed, force and passes were set automatically I didn’t have to touch a thing. If using Ratchet blade make sure you get it set to the blade setting shown on screen.
Put your vinyl on your mat black side facing up. I cut it to size of each file so there was not much waste.
Weeding Your Vinyl
Once cut now its for the weeding part.
To do that you need a weeding tool.
The file was easy to weed sometimes you cant see the cut lines a little light near where your working on does help you to see them if needed.
You will need your transfer tape to transfer it from backing of vinyl to the frame.
Cut it down to size of each file and lay it on the vinyl and lift off with vinyl intact.


Assembling The Frame
Open up your frame and take off your backing off it and remove any picture that comes with it.
Keep your glass in the frame but lay it flat on your desk as that helps you to position the vinyl right from the bottom.
Now to add your vinyl to the glass using the transfer tape.
Lay the vinyl on the glass and position it on the glass.
Once you’re happy, rub it down with your scraper making sure there isn’t any bubbles appearing.
Do the same with your sentiment but before I put it on the glass I put the poppies paper in frame and turned it around to see where about I was wanting it to go, then took it back out and added the sentiment same way as the image file.
Once both were in I added the poppies paper and turned it around again to check that it was perfect.
Now for the finishing touch of the frame.
I added battery led lights in frame but placed them behind the paper and secured them with tape and closed the frame by adding the backing of it.
Now frame is complete.
I switched the lights on and it just finished the beautiful frame off nicely.

I used 2 files and a sentiment on this frame and it has just set the frame of nicely.
It is a beautiful frame and I enjoyed putting it together, I just love it.
Now for my next project, I wonder what could it be?
I’m not saying too much but I hope you pop back along and have a catch up and read my next blog!
– Denise Clark –
Silhouette UK Blog Created By Denise Clark

Silhouette Products Used
Silhouette Designs Used
• Design Used: Kneeling Soldier
Design Store Artist: Sophie Gallo
Design Store ID: 79014 > Download
• Design Used: Poppies
Design Store Artist: Glitz Design
Design Store ID: 30064 > Download
• Design Used: Mettona Font
Design Store Artist: Ayeela Studio
Design Store ID: 281781 > Download
Share On Social Media


