Wedding Countdown Calendar Fridge Magnet | Verity Biddlecombe | Silhouette UK Blog
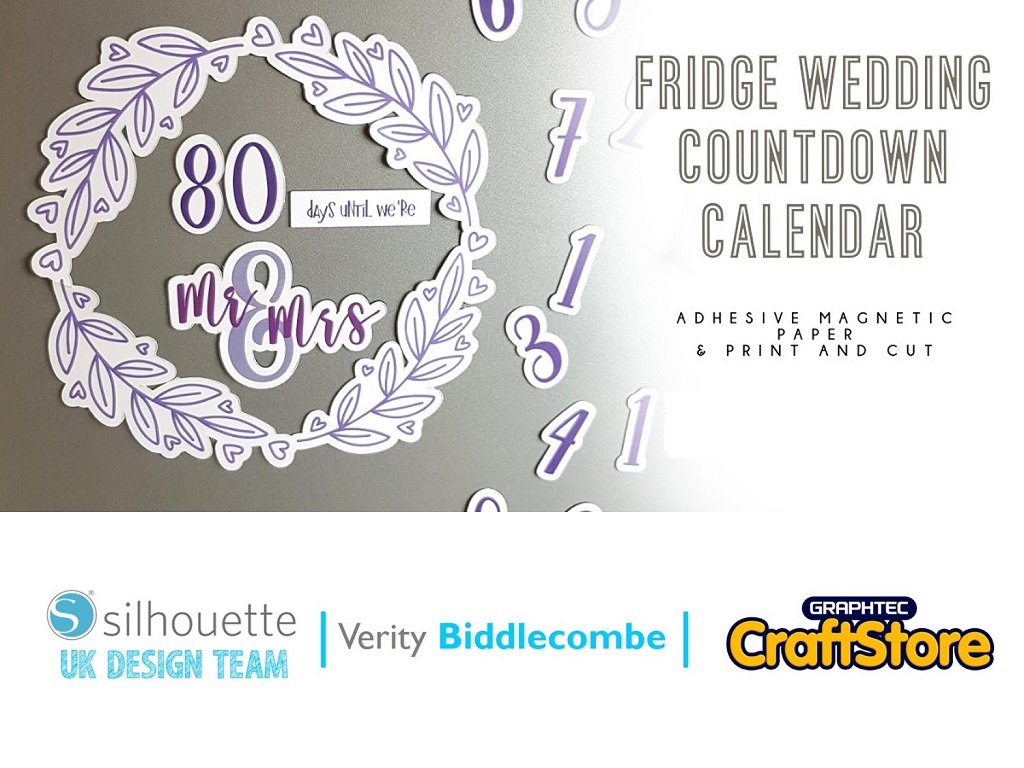
Have you tried out adhesive magnetic sheets from Silhouette? They are perfect for designing your own fridge magnets and the pre-adhesive side makes adding the designs a doddle! I used it to create this fun Wedding Countdown Calendar Fridge Magnet , but before you ask, I’m not getting married, this is just to inspire you Bride-to-be’s out there!
Step 1: Creating The Fridge Magnet Design
First, download and insert the Leaf Heart Frame design (link below) into your design window. Adjust to size making sure this is not wider than the magnetic paper. With the wreath selected open up the offset window – this is the little star icon on the right hand tool bar.
Creating The Fridge Magnet Design: Continued
With the offset window open and the design selected, apply offset. You can adjust much of an offset you have by moving the arrow for the distance. For this design, I used the offset measurement added by the software.
Step 2: Adding The Offset
Next, add in your sentiment. For the Mr & Mrs along with the numbers, I used the Nobita Script font (link below). I wrote out Mr, Mrs and the & all separately so I could alter the sizing and overlap the word with the &. For the ‘Days until we’re’ I used the Miss Rosie font (link below).
Adding The Offset: Continued
At this stage, adjust the colours of the fonts and design as you’ll be printing this out later. Once you are happy with the design, make sure you have grouped the ‘Mr & Mrs’ and offset this along with many numbers to use in the count down. For the ‘days until we’re, add a rectangle around the item.
Step 3: Cutting / Print & Cut
Load your mat with your Magnetic adhesive sheet on. You need the adhesive backing facing up so that the exposed magnetic sheet is on the mat.
Have the design to cut outline only as you want it to cut only the offset, not the intricate designs themselves. Remember to do a test cut. I had to increase the blade depth by one and do two extra passes for my machine to cut through the magnetic paper.
Cutting / Print & Cut: Continued
Once the design is cut out of the magnetic paper, you need to cover the project into a print and cut by turning the registration markers on. To do this, open the page setup window and select the print and cut tab along the top. Select Cameo 1 in the drop-down menu.
When the registration markers are added, make sure you design fits in the print area and send to your printer. Load the print onto your cutting mat and into your machine. Next, register the mat in the machine and cut out the designs.
To assemble the magnets, peel off the release paper and adhere you print-outs down.
Not only is this Fridge Magnet countdown calendar a great idea for the big day, it could easily be adapted for pregnancy and the due date of you little one. The Silhouette Adhesive Magnet sheets are so easy to use, so little your imagination go!
Silhouette UK Blog Created By Verity Biddlecombe
Silhouette Products Used
Silhouette Designs Used
Share On Social Media


