Wood Slice Christmas Tree Decoration | Victoria Yates | Silhouette UK Blog
Wood Slice – Christmas Tree Decoration
Hello crafters!!
Vicky here from Cut That Design!
I’m back with a Christmassy blog post to get you in the festive spirit.
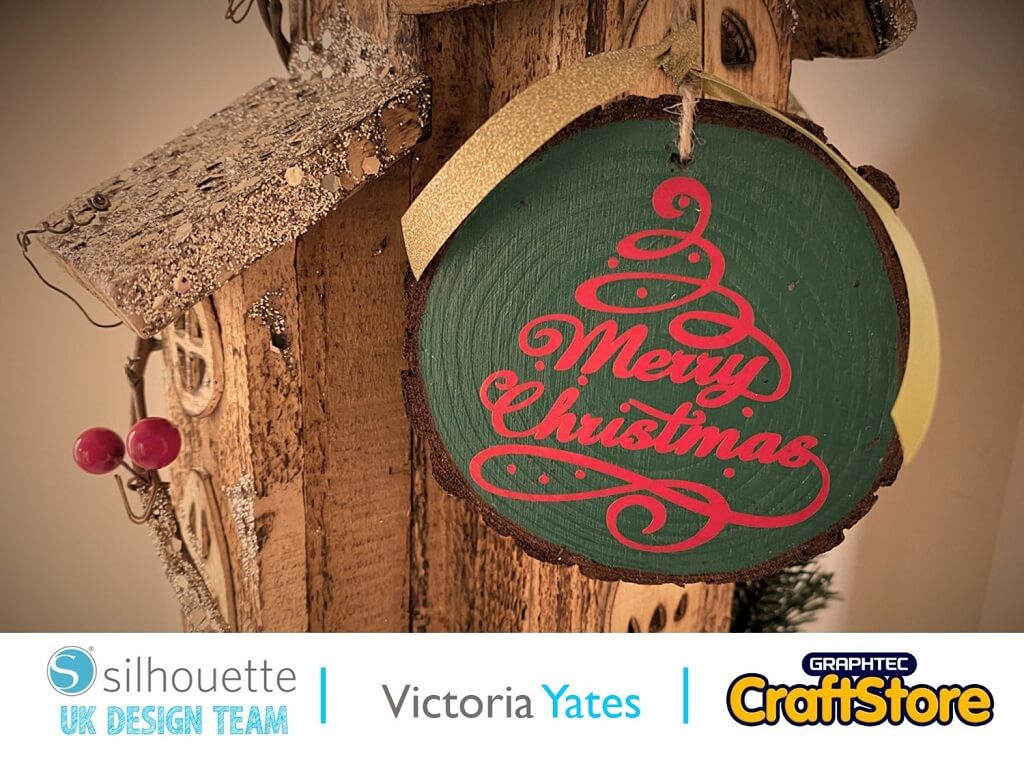
It’s one of my favourite times of the year! So today I’m going to show you how I made this Christmas tree decoration, using a wood slice and self-adhesive vinyl.
I was originally going to use glitter vinyl, however due to the intricate nature of the design and the small size it needed to be reduced to in order for it to fit on the wood slice, it didn’t cut as well. Luckily, I had some red self-adhesive vinyl to hand to save the day!
Items you will need:
Silhouette Self-Adhesive Vinyl
Acrylic Paint
Mod Podge (to seal and give a nice glossy finish)
Twine and/or Ribbon
Wood Slice With A Hole In The Top

Painting & Measuring
Firstly, I painted and measured my wood slice.
You can do this before or after painting, it won’t make any difference!
I left the painted slice to one side to dry, for 24 hours!
Finding A Festive Design
Whilst my wood slice was drying, I went to the Silhouette Design Store in search of a festive design to apply to my wood slice.
I found this pretty Merry Christmas flourish tree design, which I love!
I downloaded the design and opened it in Silhouette Studio, I then input my page settings, and reduced the size of the design to the measurements I took earlier.


Using The Offset Tool
As this is quite an intricate design, I applied a slight offset of 0.010 to the design.
Send To Cut
Once I was happy with the offset, I clicked on the ‘send’ button and applied my cut settings accordingly.
Ensure you do a test cut first if required!


Applying The Vinyl
Once the wood slice was dry, I weeded and applied the vinyl using some application tape.
I then sealed my decoration with some mod podge. This will help to preserve the outer edging of the wood slice, as it tends to flake off with it being natural.
Adding The Finishing Touches
For that finishing touch, I added some twine for hanging the decoration and some gold sparkly ribbon!


Here with have my completed Christmas Tree Decoration,
I would advise if you’re new to using glitter vinyl, don’t choose an intricate design as your first project like I did. Unfortunately, I didn’t have enough time to play about with the settings for the glitter vinyl, so I switched to Glossy Self-Adhesive vinyl, and I’m more than happy with the way it came out!
Well that’s me for now, until next time.
Happy Christmas crafting!
– Victoria Yates xx –
Silhouette UK Blog Created By Victoria Yates
Silhouette Products Used
Silhouette Designs Used
• Design Used: Merry Christmas Flourish Tree
Design Store Artist: Lori Whitlock
Design Store ID: 231820 > Download
Share On Social Media


